
In this article, we’ll continue developing our shortcode creation plugin and take a look at how to create tables in the WordPress admin panel. Of course, we could do without a table by defining an N-number of fields for our shortcodes. But having the ability to create an unlimited number of them will be an invaluable advantage for our plugin. Moreover, this gives us a good opportunity to deepen our programming skills within WP.
As usual, let’s start from the beginning — creating the plugin files (in future articles, this will not be repeated). Inside the “/wp-content/plugins/” directory, create a folder named “wp2fl-lessons-table-create-part1”, and inside it — the file “wp2fl-lessons-table-create-part1.php”.
At the top of the file, insert a comment that describes our plugin:
/*
Plugin Name: WP2FL. Lessons "Tabele Create" Part 1
Plugin URI: plugin url
Description: Lesson. Creating a table. Part 1
Version: 2.0
Author: Pavel
Author URI: author site url
License: GPL2
*/
For learning purposes, you can name your plugin whatever you like. But if you plan to publish your plugin on the official WordPress website, make sure no other projects exist under the same name — otherwise, conflicts may arise.
Next, insert:
defined('ABSPATH') or die('No script kiddies please!');This restricts direct access to our file (e.g., from the browser address bar).
Now let’s call the class responsible for building the admin menu and displaying the table:
if(is_admin() == TRUE)
{
    new WP2FL_INIT_Lessons_Menu_Table_Create();
}
Access will be available only to administrators.
I’d like to draw your attention to a convenient approach to using classes and hooks. With this implementation, you don’t need to manually prefix every function name for hooks. You only need to prefix the class name once.
Next, we create our class:
class WP2FL_INIT_Lessons_Menu_Table_Create
{
/* … */
}
Later, we’ll fill it with the following code:
public function __construct()
{
	add_action('admin_menu', array($this, 'createMenu'));
}
When initialized, the class will automatically trigger its constructor, which will then hook into WordPress and register our menu-creation function.
public function createMenu()
{
	add_menu_page('WP2FL. Lessons "Tabele Create"', 'WP2FL. Lessons "Tabele Create"', 'manage_options', 'wp2fl_init_lessons_menu_table_create', array($this, 'createTable'));
}
This adds a menu item to the WordPress admin sidebar titled “WP2FL. Lessons Tabele Create”. The `add_menu_page` function takes seven parameters:
$page_title — Title of the plugin page
$menu_title — Menu item label
$capability — User capability required to view this page
$menu_slug — Unique ID of the page, used in the URL
$function — Callback function to display the page content
$icon_url — Icon for the menu item
$position — Position of the menu item in the admin menu
The function calls the `createTable` method of our class:
public function createTable()
{
	$Table = new WP2FL_Lessons_Menu_Table_Create();
	$Table -> prepare_items();

	?>
		<div class="wrap">
			<h2>Example List Table</h2>
			<?php $Table -> display(); ?>
		</div>
	<?php
}
This is straightforward:
1. Instantiate the class `WP2FL_Lessons_Menu_Table_Create()` which handles the table creation.
2. Prepare the data using `prepare_items()`.
3. Output a simple HTML layout and display the table using `display()`.
At this point, we’ve completed the menu setup. Now we can move on to creating the table.
Class to create a simple table in the WordPress admin panel
The first thing we need to create the class `WP2FL_Lessons_Menu_Table_Create()` — responsible for generating our table — is to include the core parent class:
if(class_exists('WP_List_Table') == FALSE)
{
    require_once(ABSPATH.'wp-admin/includes/class-wp-list-table.php');
}
After including it, we define our class:
class WP2FL_Lessons_Menu_Table_Create extends WP_List_Table
{
/* … */
}
Then we implement the `prepare_items()` method:
public function prepare_items()
{
//Sets
$per_page = 5;

/* Отримуємо дані для формування таблиці */
$data = $this -> table_data();

/* Встановлюємо дані для пагінації */
$this -> set_pagination_args( array(
'total_items' => count($data),
'per_page' => $per_page
));

/* Ділимо масив на частини для пагінації */
$ data = array_slice (
$data,
(($this -> get_pagenum() - 1) * $per_page),
$per_page
);

/* Встановлюємо дані колонок */
$this -> _column_headers = array(
$this -> get_columns(), /* Отримуємо масив назв кілок */
$this -> get_hidden_columns(), /* Отримуємо масив назв колонок які потрібно приховати */
$this -> get_sortable_columns() /* Отримуємо масив назв колонок які можна сортувати */
);

/* Встановлюємо дані таблиці */
$this -> items = $data;
}
This method is mandatory and must be overridden. Otherwise, nothing will work. It handles data loading, pagination, and sorting.
Since this tutorial doesn’t cover database interaction, the data will come from a static array (see `table_data()` method).
Code:
$this -> _column_headers = array(
	$this -> get_columns(),
	$this -> get_hidden_columns(),
	$this -> get_sortable_columns()
);
This is required to define the table columns. The methods used here are explained below.
public function get_columns()
{
	return array(
		'ex_id'			=> 'ID',
		'ex_title'		=> 'Title',
		'ex_author'		=> 'Author',
		'ex_description'=> 'Description',
		'ex_price'		=> 'Price',
	);
}
This method returns the array of column names. It’s essential — without it, the table will not be rendered.
public function get_hidden_columns()
{
	return array();
}
This method returns an array of columns that should be hidden. Why hide columns? Think of your own use cases 🙂
public function get_sortable_columns()
{
	return array(
		'ex_id' => array('ex_id', false),
		'ex_title' => array('ex_title', true),
		'ex_author' => array('ex_author', false),
		'ex_price' => array('ex_price', false),
	);
}
This method defines which columns are sortable (you’ll see arrows and clickable headers in the table).
The structure of the array looks like this:
'ex_id' => array('ex_id', false)Where:
ex_id — the column name to sort
ex_id — the value for the `orderby` GET parameter
false — sort direction (false = asc, true = desc)
The resulting link will be like: `...&orderby=ex_id&order=asc`
Next:
private function table_data()
{
return array(
array(
'ex_id' => 1,
'ex_title' => 'A Street Cat Named Bob',
'ex_author' => 'Bowen James',
'ex_description'=> 'Worldwide bestseller! Film adaptation in the works! He was a lonely homeless musician, but saw on',
'ex_price' => '61.00',
),
/* ... */
array(
'ex_id' => 13,
'ex_title' => 'Colbabowe Vino',
'ex_author' => 'Bradbury Ray',
'ex_description'=> 'Ray Bradbury's novella "Colbabowe Vino" was released in the summer of 1928 near the town of Gr… ',
'ex_price' => '45.90',
),
);
}
This method is used only for the tutorial; in a real plugin, data would come from the database.
And finally:
public function column_default($item, $column_name )
{
	switch($column_name)
	{
		case 'ex_id':
		case 'ex_title':
		case 'ex_author':
		case 'ex_description':
		case 'ex_price':
			return $item[$column_name];
		default:
			return print_r($item, true);
	}
}
This method renders the actual cell content. For example, you can wrap a value in a `` tag to make it bold. This is a basic example — we’ll explore more advanced formatting in the next lesson.
The result looks like this:
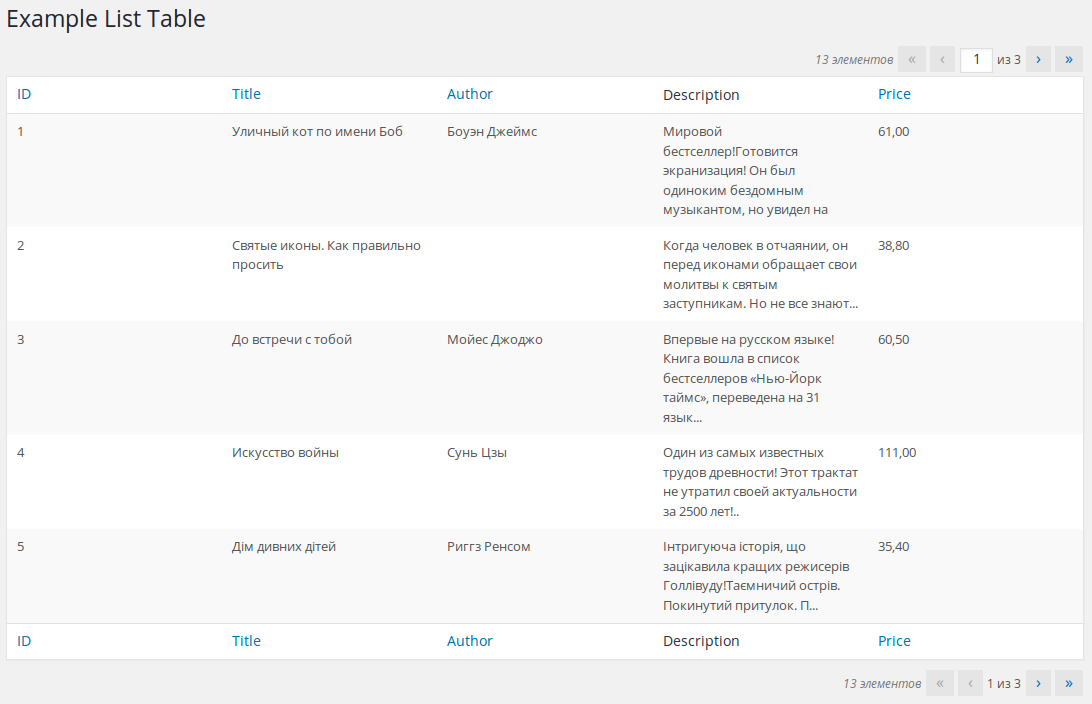
You can download the plugin via this link.
In the next article, we’ll extend the capabilities of our class by adding search forms, styling, checkboxes, and bulk actions.