
Let’s continue developing our post autocomplete plugin. Today we’ll explore Ajax functionality in the WordPress engine—what, how, and where to hook into it, how to test the logic without a frontend, and what requests should be sent to the server.
Let’s move to the code. Open our only project file so far: “/wp-content/plugins/wp-post-autocomplete/wp-post-autocomplete.php”. Place the cursor inside the constructor of the `WpPostAutocomplete` class and add the following lines:
add_action('wp_ajax_autocomplete', array($this, 'ajax_autocomplete'));
add_action('wp_ajax_nopriv_autocomplete', array($this, 'ajax_autocomplete'));
In the snippet above, we used WordPress’s `add_action()` function to register our custom hook for handling Ajax requests. Note the naming convention:
- `wp_ajax_...` — for logged-in users.
- `wp_ajax_nopriv_...` — for guests (non-logged-in users).
And the suffix (in our case `autocomplete`) should match the `action` parameter sent via POST/GET from the frontend. The hooks will look like this:
add_action('wp_ajax_{autocomplete}');
add_action('wp_ajax_nopriv_{autocomplete}');
Where `autocomplete` is the same value passed through the `wp_localize_script()` function (see the previous lesson).
The second parameter of our `add_action()` call is the method that will handle the Ajax request. Here is the implementation of the `ajax_autocomplete()` method:
public function ajax_autocomplete()
{
	try
	{
		$Posts = get_posts([
			'posts_per_page' => 10,
			's' => esc_sql(filter_input(INPUT_POST, 'text', FILTER_SANITIZE_STRING)),
		]);

		$array = [];
		foreach($Posts as $Post)
		{
			$array[] = [
				'title' => $Post -> post_title,
				'link' => get_permalink($Post -> ID),
			];
		}

		wp_send_json_success($array);
	}
	catch (Exception $ex)
	{
		wp_send_json_error(array(
			'message' => 'Failed to process request',
		));
	}
}
Let’s break it down:
- Retrieve the search text using:
filter_input(INPUT_POST, 'text', FILTER_SANITIZE_STRING)
- Use the `get_posts()` core function to fetch up to 10 matching posts, searching both titles and content:
$Posts = get_posts([
	'posts_per_page' => 10,
	's' => esc_sql(filter_input(INPUT_POST, 'text', FILTER_SANITIZE_STRING)),
]);
- Prepare an array of results with titles and links:
$array = [];
foreach($Posts as $Post)
{
	$array[] = [
		'title' => $Post -> post_title,
		'link' => get_permalink($Post -> ID),
	];
}
- Send the data back as a JSON success response:
wp_send_json_success($array);
- In case of an exception, send a JSON error:
wp_send_json_error(array(
	'message' => 'Failed to process request',
));
You could also extend this to handle cases where no results are found, but since our plugin is fairly simple, we’ll skip that for now.
Testing
If the frontend had already been implemented, we could test with a form and the browser’s developer tools. However, since that’s coming in the next lesson, we’ll use the terminal and `curl`. If `curl` is not installed, install it and run the following commands to test:
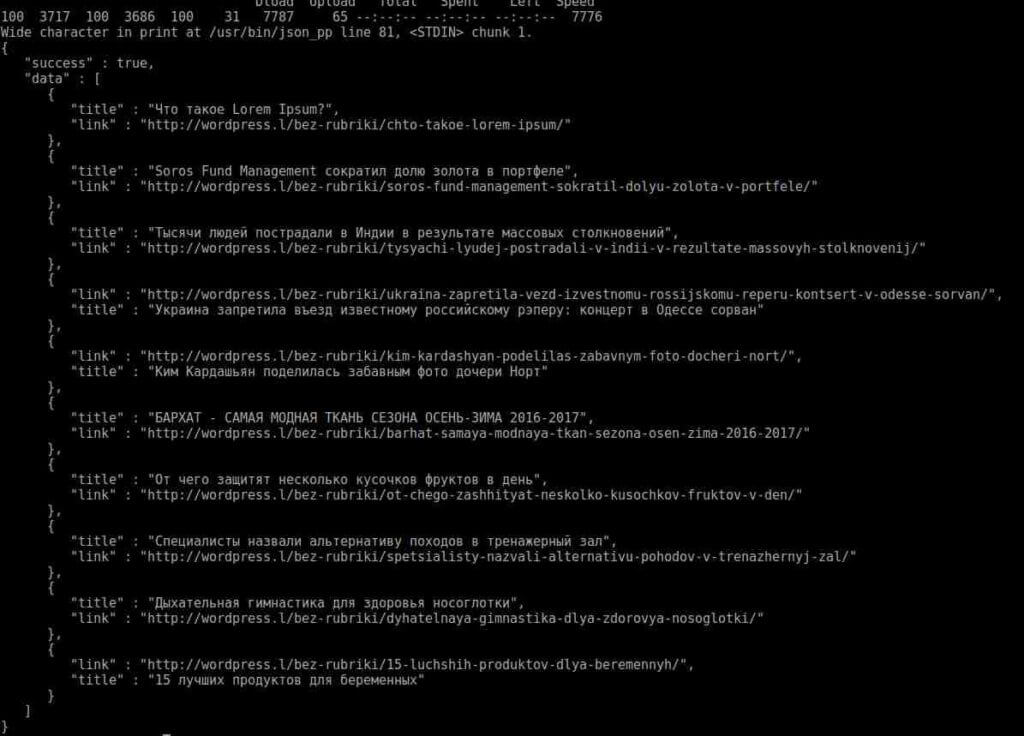
curl -d "action=autocomplete&text=this" -X POST http://wordpress.l/wp-admin/admin-ajax.php
Or, for pretty-printed JSON output:
curl -d "action=autocomplete&text=это" -X POST http://wordpress.l/wp-admin/admin-ajax.php | json_pp
The difference between the two is the use of `json_pp`, a utility to format the JSON response nicely.
That’s it! You can find the code for this lesson in our GitHub repository via this link.
Full lesson list
- Lesson 1: How to Write a WordPress Plugin Yourself
- Lesson 2: Creating a Shortcode for WP Post Autocomplete
- Lesson 3: Adding CSS and JS Scripts to the Plugin
- Lesson 4: Ajax Integration for the Post Autocomplete Plugin
- Lesson 5: Connecting jQuery Autocomplete to the Plugin
- Lesson 6: Displaying Posts and Pagination